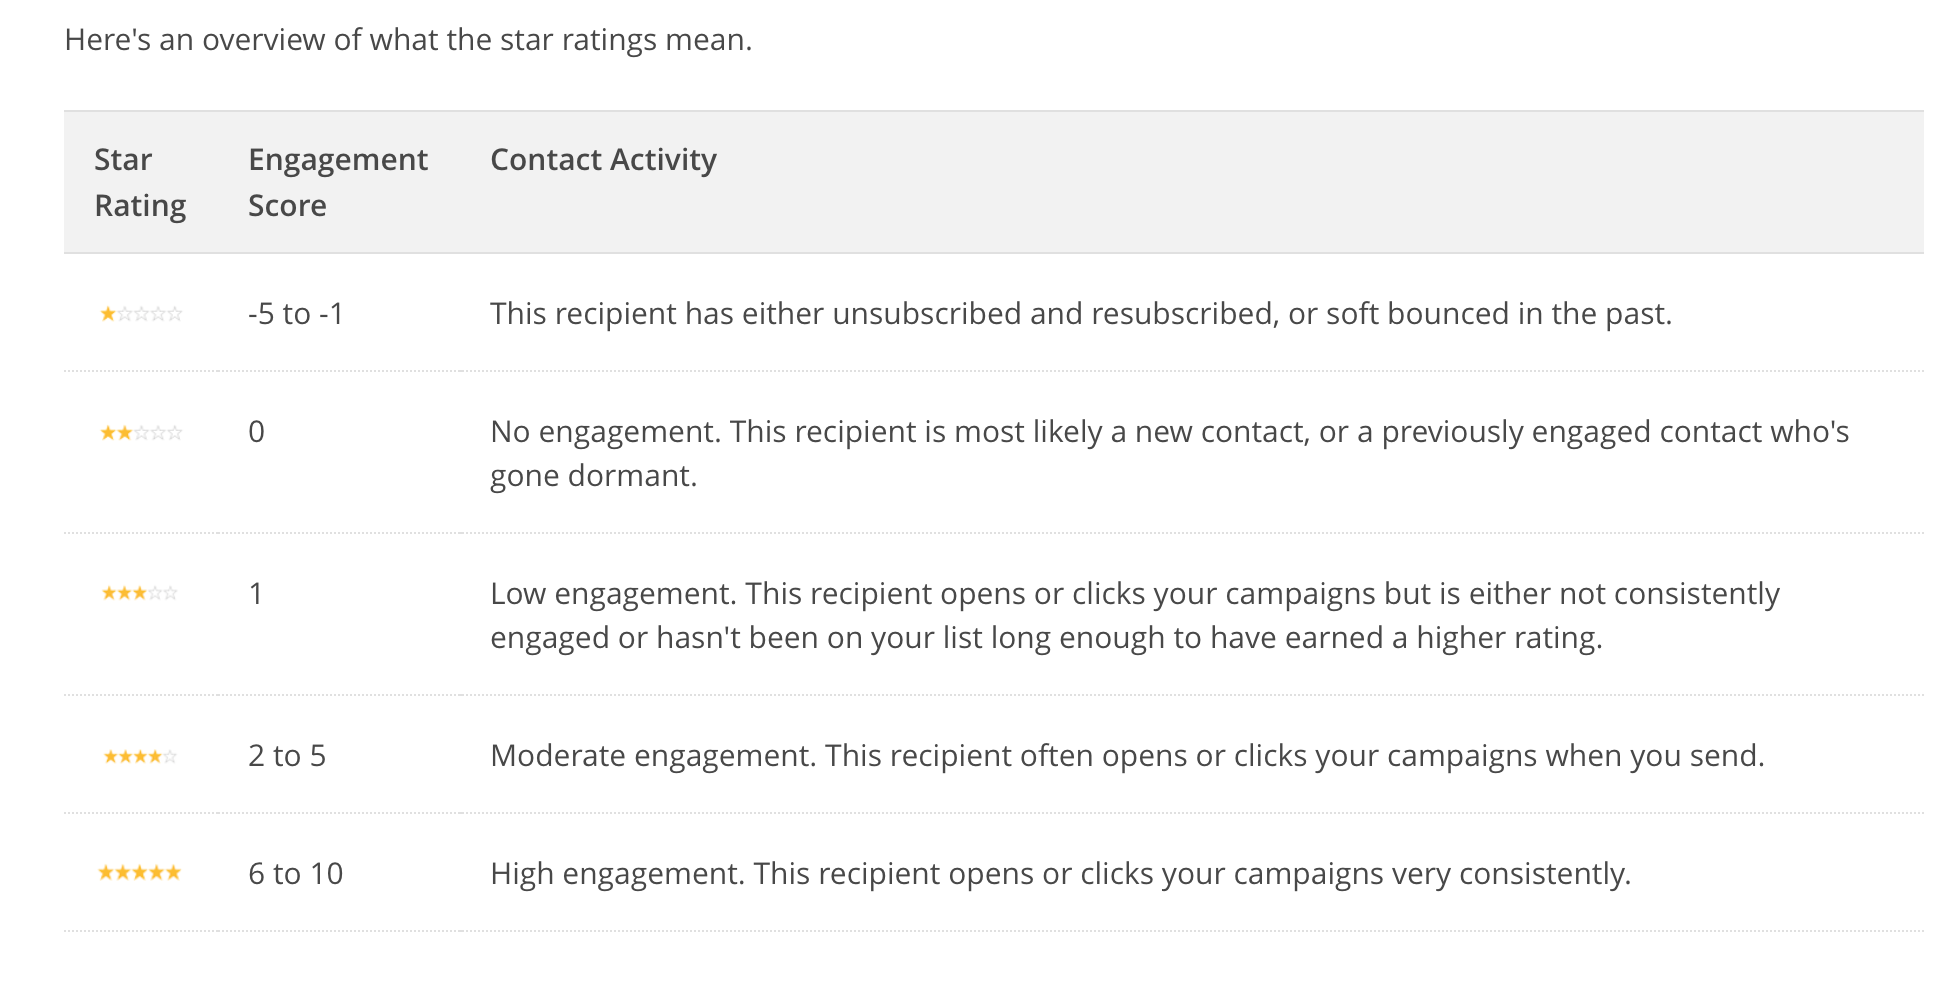
Need to map the Mailchimp Member rating back to your CRM / Financials Software?
You can map to a Text field works fine as the Contact Rating (Member Rating) is a negative number to a positive number based on Stars given.
Head to Step 4 of the Set Up then map the Member Rating from Mailchimp to your CRM / Financials Software. Make sure that the mapping direction will be from Mailchimp to your CRM / Financials Software.
See Mailchimp help article here...
Need some help?
Check out the options below on how you can contact our support team and find the answers you need to help you with your SyncApps integrations.
Help Center & Email is 24/7 to [email protected] | Live Chat & Phone is scheduled
FAQs
Check out these Help Desk articles for answers to frequently asked questions.
Looking to see how Salesforce integration works with your marketing automation solution?
You’ve come to the right place!
Let's take a Salesforce Integration with Constant Contact as our example of how it works and how it is setup:
We’ve put together a straightforward guide to help you through the setup process. We strongly believe that once everything is up and running, you’ll be in a better position to manage your customer databases and eventually achieve your goals.
Here are just some of the many platforms supported by our “Built on Salesforce” software:
- PatronManager
- Raiser’s Edge
- Ascendix
- Apto
- Navatar
- Propertybase
- Nonprofit Success Pack™ (NPSP)
See What You Can Do:
- Sync your Contacts, Leads, Person Accounts, and Campaign Members to Act-On, Constant Contact, Salesforce Marketing Cloud, and Mailchimp.
- Integrate Accounts, Person Accounts, Contacts, and Leads. Sync Campaign Metrics. Sync Lists, Groups, and Segments. Add/Remove from Lists/Groups based on rules. Opt-outs are synced bidirectionally. Custom Opt-Outs are supported. Custom Field mapping. Scheduling and real-time integration. And much more.
Get started with your 4-week trial!
Let's take a look step-by-step at how to integrate Salesforce using Constant Contact as an example:
The use case below is for a Constant Contact subscriber, and the same process will apply to Mailchimp, HubSpot, Klaviyo, Drip, and other supported marketing automation solutions.
SALESFORCE INTEGRATION ROLE PERMISSIONS:
- API Enabled permission to access any Salesforce API
- Object permissions for all needed
- Page layout assignments for all required by your role
- Record type assignments if using record types
- Contacts
- Leads
- Accounts
- Campaigns
- Campaign Members
- Campaign History
- Custom Fields
- External data source access
- The detail and edit pages
- Related lists
- List views
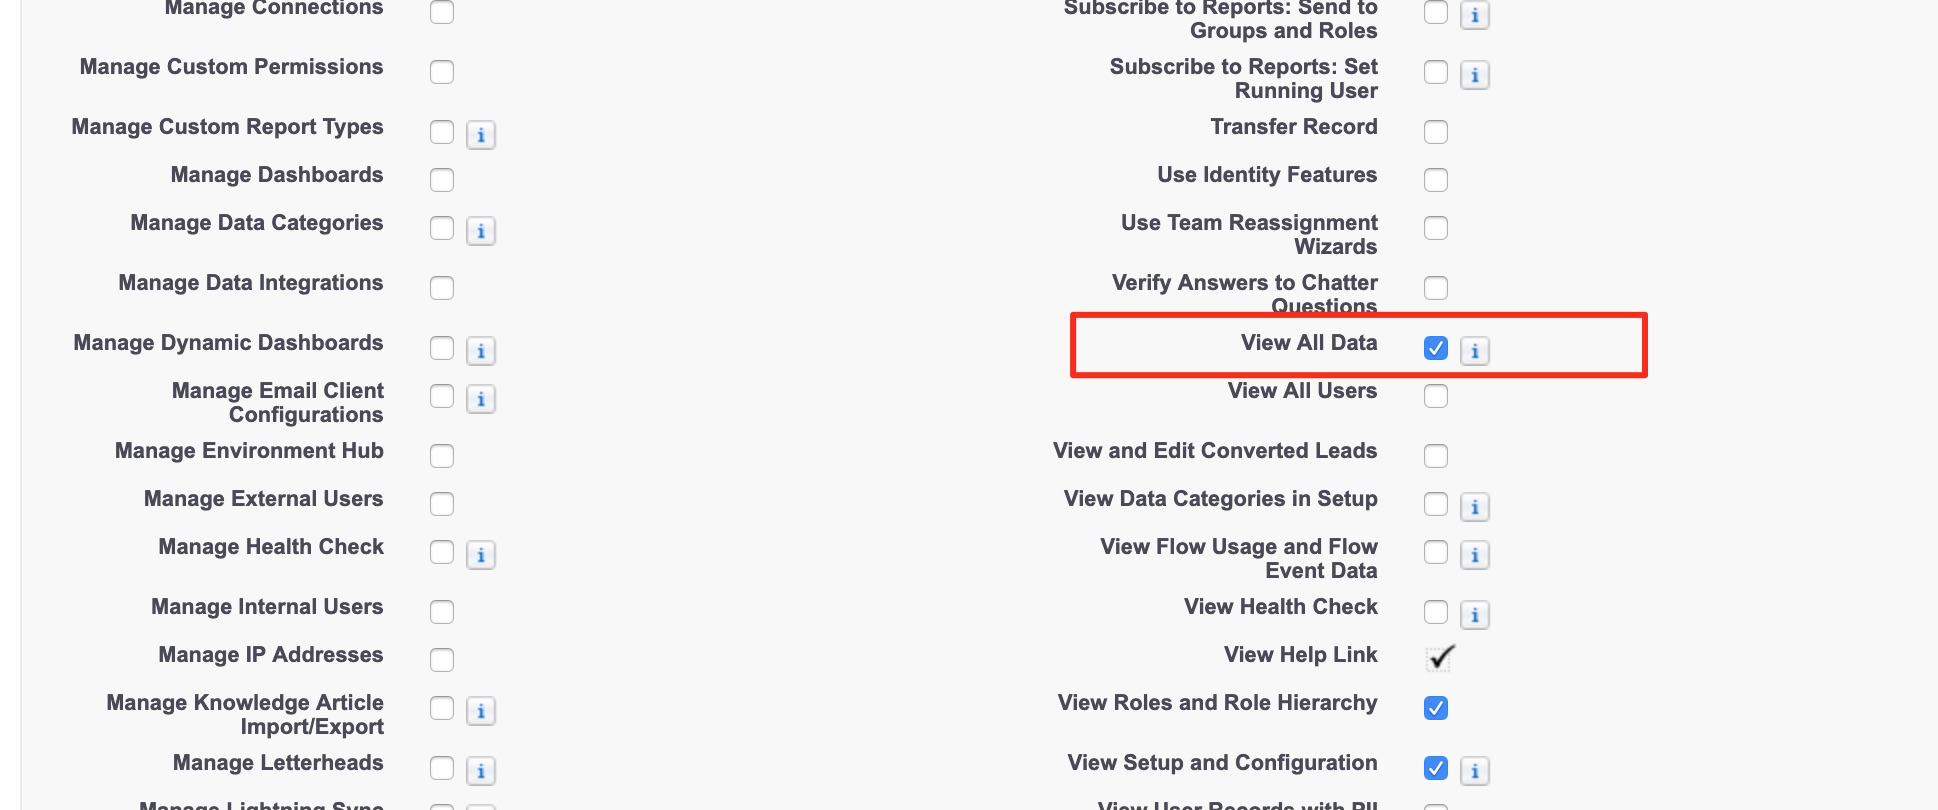
Profile > Administrative Permissions > View All Data
Or use a Salesforce Integration user
Step 1: Salesforce
- First, you need to create a Set Up, which is just another term for integration. It can also include Full Sync, Field Mapping, and more.
- Then enter your Profile Name. The Set Up Name is just a description for remembering the Set Up you created.
- Select the Connect to Salesforce button using oAuth and enter the credentials.
- Next, select Object Type to Sync. If you’re satisfied with your settings, you can proceed to Step 2.
Step 2: Constant Contact
- Enter Constant Contact credentials. Connecting to Constant Contact is super simple. Press the button to log in to the account to validate your Set Up. Hover over SyncNotes to learn what the Main List is all about. To check your Main List, go to your Constant Contact account and choose your preferred Main List. You can copy and paste it into the Main List text box.
(2022 onward plans, all Add-Ons are included in Steps 1 & 2)
The Full Sync applies to CRM and eCommerce platforms and can be used in our trials and plans. The CRM must have List integration to be able to use Full Sync.
Read more about how the Full Sync Feature can automate your contact management today in our article here.
The Full Sync can be scheduled to Manual, Daily, or Weekly.
It allows you to keep your systems trued up with ease.
Step 3: Field Mapping
- Field mapping from your chosen software one and two allows you to update existing or new records easily.
Step 4: Filtering and Segmentation
- Filtering takes CRM records, filters them based on specified criteria, and syncs your records into your target application.
- Segmentation sync records from each defined segment into separate lists or groups.
Step 5: Sync Scheduling
- Sync Scheduling can be set up for free trials and all plans.
- Sync on Demand is available on all trials to allow quick testing of your software integration.
Set Up Page
- Press the Sync Now button from the Set Up screen to sync your data immediately.
- Wait until the Sync Process is complete.
- After that, you can view Sync Summary in Sync Logs.
- Visit your Salesforce Contacts to see if they are Synced
You’re all done!
If you get stuck and need help, please feel free to reach out to our support team 24/7.
Once you set up your Set Up, these are the next steps.
Best Testing Practices for Your 4-Week Free Trial
1. Ensure that you have created 2 Set Ups if you are using both Leads and Contacts. Select Accounts as the object type if you are using Salesforce Accounts.
2. Create one Salesforce Campaign or List View for testing purposes. You can use our Filter and Segmentation feature in tandem with each Salesforce Campaign or List View. Please note to have test records in it
3. Head to SyncApps and select your test Salesforce Campaign or List View. If you choose Filters, select the specific records from the precise Salesforce Campaign or List View. Please review this link if you want to add Salesforce Person Accounts.
4. Ensure that the “Email Opt-Out” field is visible on the Salesforce Account, Contact, or Lead Page Layout. It facilitates easy testing of unsubscribes from your Marketing Automation Solution or CRM through frequent manual inspection. SyncApps uses the default Email field in Salesforce for syncing email records between systems unless using a custom email field.
5. Go back to your Marketing Automation Solution to create and use an empty list to integrate into the Main List mentioned in Step 2 of your integration process. SyncApps creates the list automatically, or there is an option to use an existing List. This list will be used for the integration of all your Contacts in your Marketing Automation Solution. Press next until you get to the ‘Finish’ option.
6. Press “Sync Now” on your Set Up page.
7. Head over to check your Marketing Automation Solution Lists for the Salesforce Campaign or List View synced from Salesforce. The Main List will now contain the records you placed into the Salesforce Test Campaign or List View or those records from the Filter you are testing against the Salesforce Test Campaign or List View.
Once completed, you can remove the testing settings and keep the features you need, like Campaigns, Marketing Lists, or Filtering.
Salesforce Supported Editions
Subscribing to Salesforce, SyncApps is available for Salesforce Professional (API Enabled), Enterprise, Performance, Unlimited, and Developer editions. Check out the Salesforce Lightning editions supported.
Please note that due to restrictions on Salesforce Professional Edition, the ability to look up Salesforce information and post back from applications requires adding API access to your Professional Edition organization. It will attract an additional cost to the Professional Edition.
Getting Started/Basic Concepts
Sign up for a SyncApps Account and review this help center article in detail.
Let’s get started with the basic concepts:
Opt-Out Field:
The "HasOptedOutEmail" must be accessible by API and placed on each Salesforce Layout. Please make sure that the "HasOptedOutEmail" is visible and editable in both Contact & Lead layouts.
SyncApps does support custom Opt-Out fields if you need this feature, please enable it on Step 3 Field Mapping.
Campaigns:
For Campaign Responses flowing back to Salesforce, there are two methods that can be synced:
- Individual statistics: synced to the Campaign Member Object. Custom fields for Sends, Opens, and Clicks are auto-created by SyncApps. Fields need to be placed on the Campaign Member layout, so they are accessible by the Salesforce API.
- Summary statistics: synced to Campaign Object. Custom fields for total Sends, total Opens, and others must be manually created in Salesforce. They also need to be mapped in each Set Up. All newly created fields to be mapped in Step 3 of your Set Up under the Campaign tab need to be placed into the Salesforce Campaign layout. Please enable this feature for Campaign Response Type.
Step 3 Field Mapping:
Salesforce:
Activities:
If you select to create an Activity in your SyncApps configuration, you need to make sure that each event, such as Opening and Clicking, will create a new Activity (Task) in Salesforce.
Campaign Member's custom fields are created when "Sync Campaign Responses" in Step 1 of any Set Up is selected, and the "Next" or "Save" buttons are pressed or clicked in a Set Up configuration.
Getting Started - Campaign Layout Fields
Once you have created a Set Up (see above) from your dashboard and are on Step 1, selecting "Sync Campaign Response," check your Salesforce layouts to make sure all the fields created by SyncApps are dragged into the layouts for your Salesforce organization before continuing to Step 2.

Sync Campaign Responses feature is required in Step 1 of your Set Up setup before SyncApps automatically create fields.
In Lightning Salesforce:
Did we mention that we also support your Marketing Automation Solution Drip Email Campaigns to help your Salesforce metrics and in various ways to meet your requirements? Well, we do!
Email metrics flow back to Salesforce based on your choice in Step 1 of your Set Up Setup.
What type of metrics do you want to bring back into Salesforce?
- Campaign in Salesforce
- Activity in Salesforce
- Both Campaign & Activity
- Note + HTML Template
- Sync Marketing Metrics only
Please also be sure to place the Activity fields created by SyncApps on your Contact or Lead layouts.
Using Accounts Object (Person accounts) and need to see Campaign Metrics?
Three layouts need to be edited to work for Salesforce Professional Edition with API Enabled:
- Campaign Page Layout: Add Campaign CazoomiID (optional for Enterprise Edition, but make sure the username has access to the fields)
- Campaign Member Page Layout: Add Campaign CazoomiID, Clicks, Bounces, Forwards, etc. (optional for Enterprise Edition, but make sure the username has access to the fields)
- Contact or Lead Page Layout: Add Clicks, Bounces, and Forwards to the Campaign History-related list (optional, but needed to see the metrics in the Contact or Lead layout.)
Salesforce layouts check:
- Drag Campaign CazoomiID into the Email Campaign Page Layout
- Drag CampaignMember CazoomiID into the Email Campaigns Member Page Layout and any fields you want to report on, like Opens, Clicks, Forwards, and Bounces
- The Campaign metrics fields placed in the Campaign History layout (related lists) + Email Events will bring in the "URLs clicked" in the email into Salesforce from your Marketing Automation solution.
- Campaign Response is synced every 24 hours. If you need Campaign metrics to sync back more frequently, please enable this feature from the Scheduling Tab in your integration.
Note:
For Salesforce Campaign Member Status, we always sync with the latest status, one of the following:
- Clicked: If the recipient clicked
- Opened: If the recipient opened
- Bounced: Email Bounced
- Unsubscribed: Opted Out of an email campaign
- Sent: If the recipient is a member of the Email Marketing Campaign and none of the above statuses applied.
Individual Contact Record:
If you need to use Salesforce Campaigns, only then the Full Sync is required.
So mainly, if you want to use Salesforce Campaigns and want to remove members automatically, this feature, "Full Sync," will automatically manage the Contact and Lead record removal features for Campaign members to Email Marketing Lists and Groups on each Full Sync schedule.
This means that anytime a record is added to or removed from a synced Salesforce Campaign, created by SyncApps, it will always be in sync with the Marketing Automation Software you use today.
Need some help?
Check out the options below for contacting our support team and finding the answers you need to help you with your SyncApps integrations.
Help Center & Email is 24/7 to [email protected] | Live Chat & Phone is scheduled
FAQs
Check out these Help Desk articles for answers to frequently asked questions.
Let's discuss how to see Marketing Metrics back in NetSuite.
How it works:
- Activate the "Sync Email Marketing Data" in Step 1 of the integration Set Up.
- If this option is checked, email marketing data (Opens, Clicks, Bounces, and URLs Clicked Metrics) will be synced to a custom record in NetSuite.
- A Custom Record with the name "(Your Email Marketing Software) Email History" for Contacts and "(Your Email Marketing Software) Emails-Cust" for Customers is created automatically by SyncApps and captures data for 30 days after a campaign is initiated. (You can also capture data going back months and years if desired by using the feature for data migration in each integration under the Scheduling step)
- After sending a Campaign to your designated Main List or Audience, SyncApps will automatically synchronize the Marketing Metrics with NetSuite into the Custom Record.
- Email Marketing Campaign metrics land on the Custom Subtab on the NetSuite Customer and Contact records.
- The NetSuite Custom Subtab name can be changed to meet your needs in NetSuite.
How to change the NetSuite custom subtab name:
First, go to Customization, then select Forms and tap on Entry Forms.
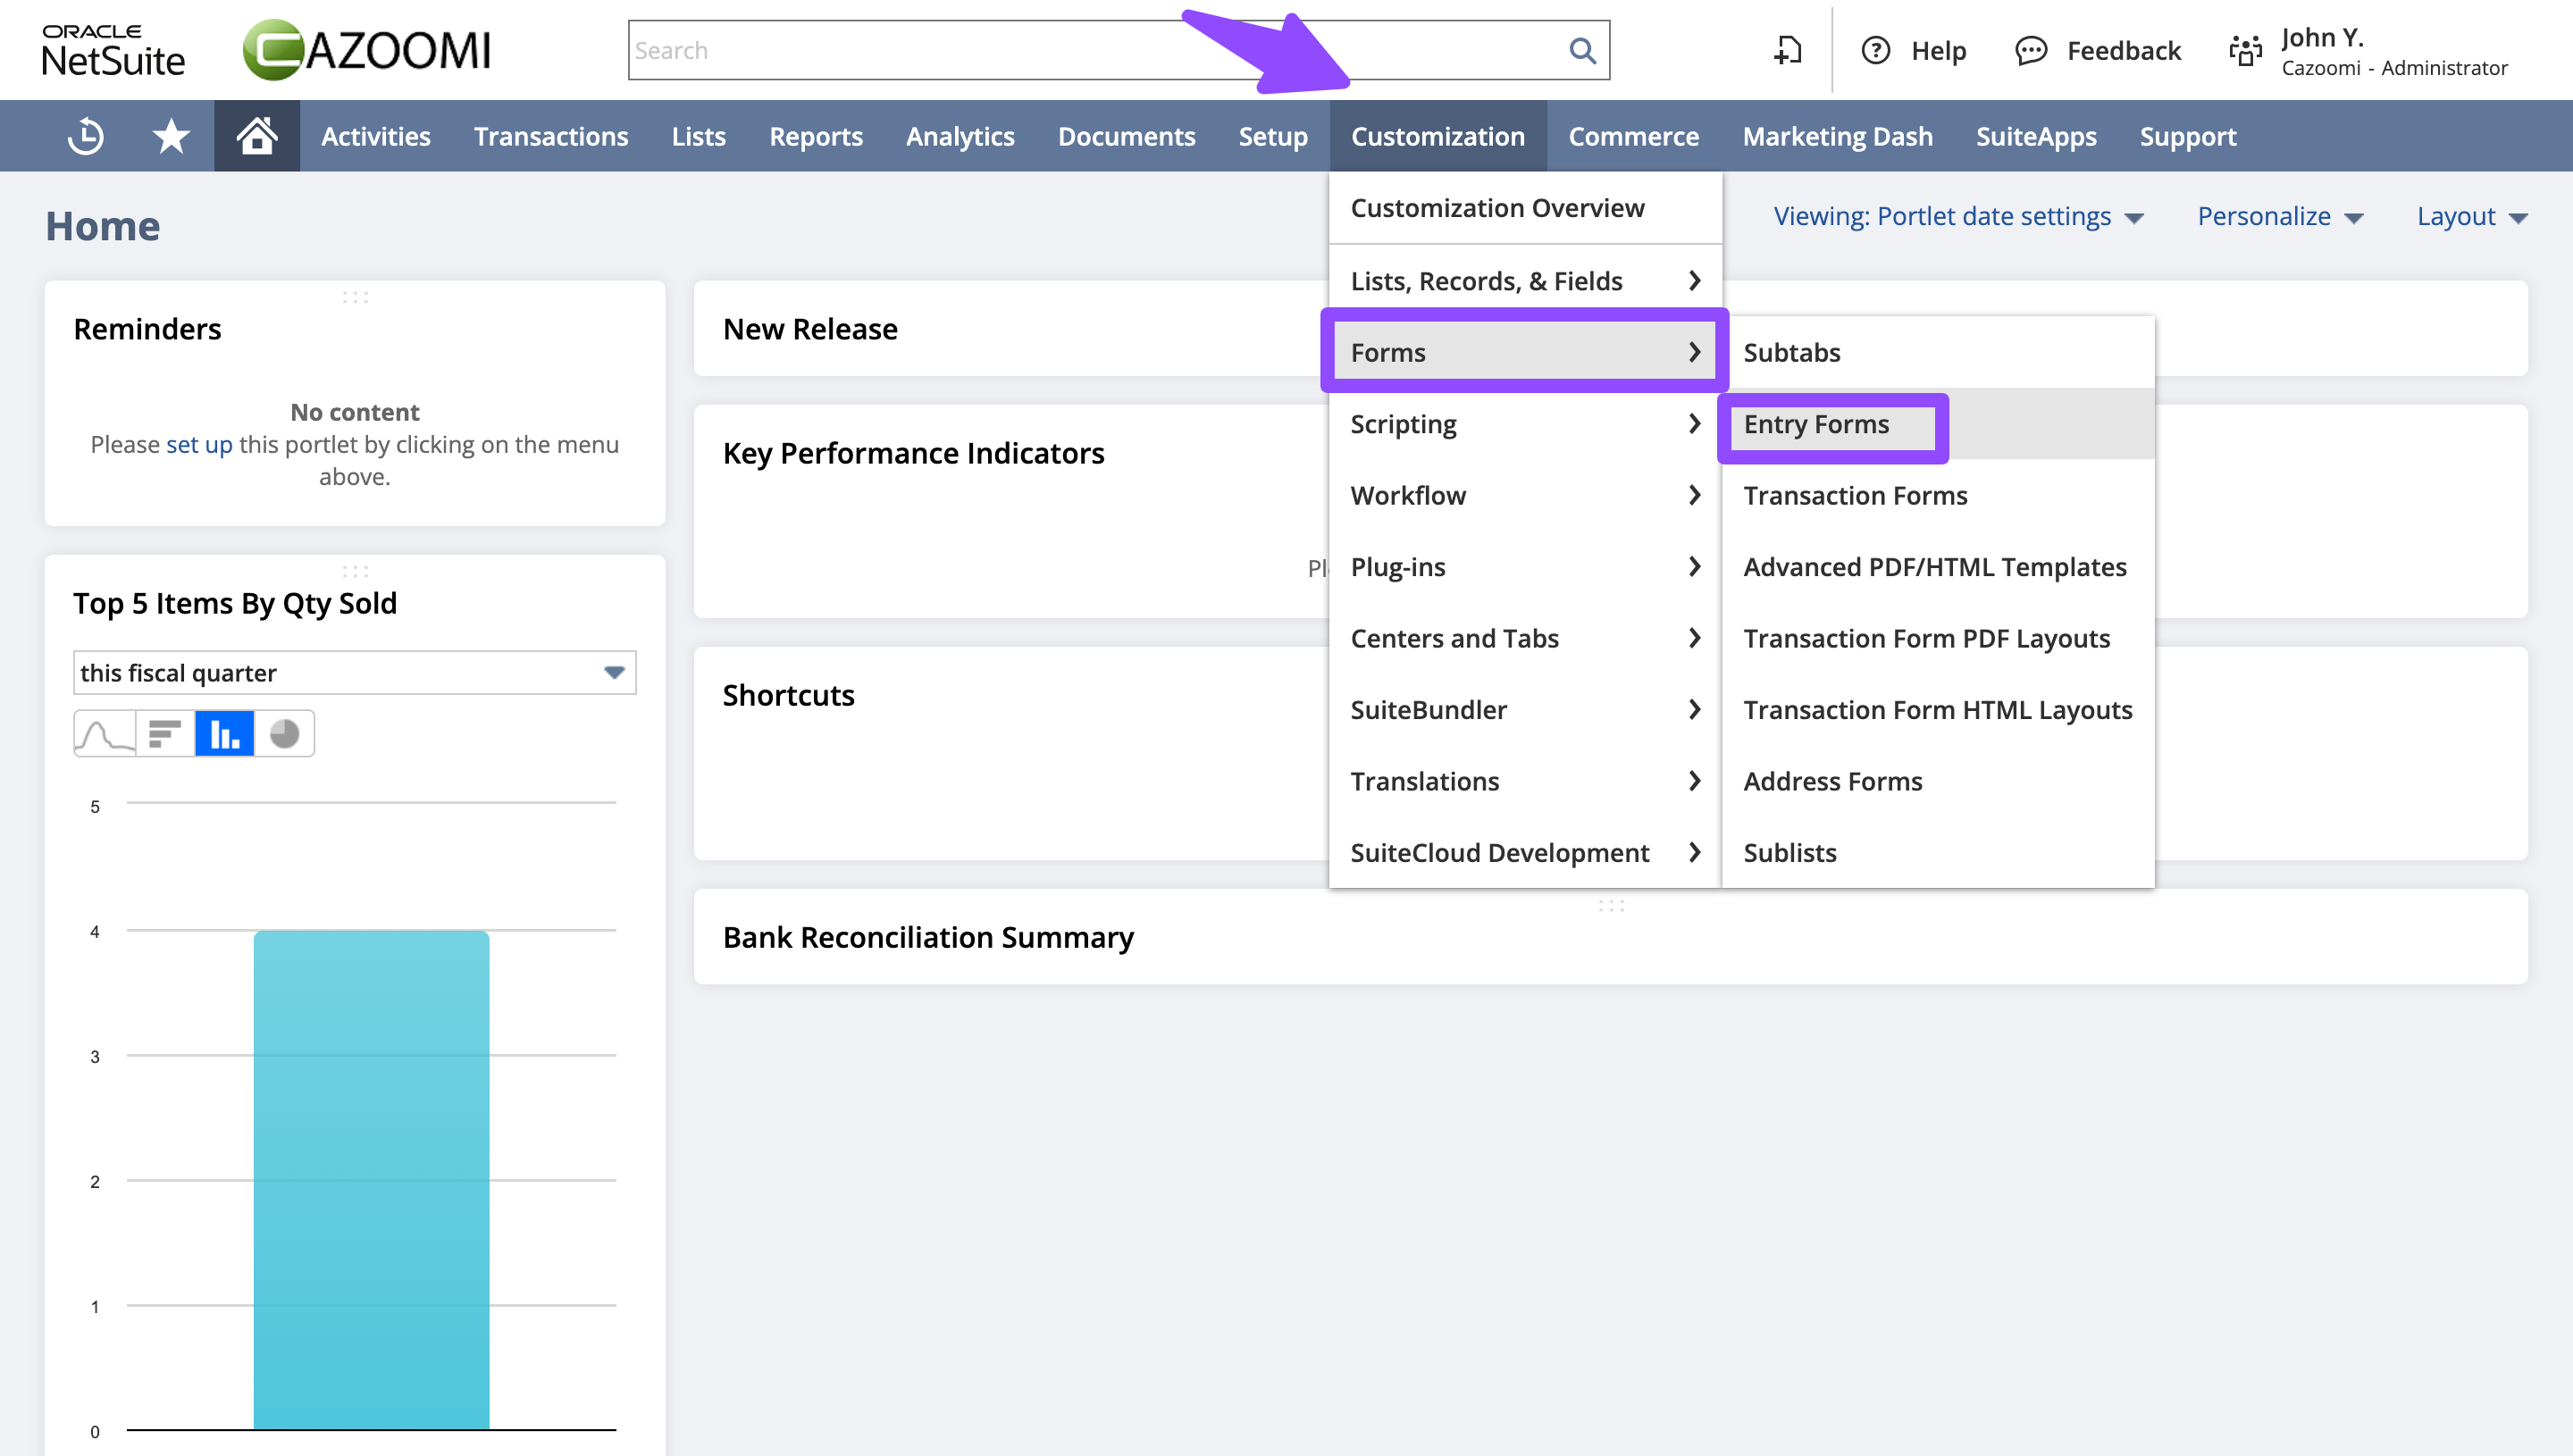
Then locate the Custom Entry Form for the Contacts Subtype used in NetSuite and select edit to ensure it is the preferred option.

Finally, move on to Sublists, where you can find the Subtab and make edits. (Same process for Customer/Lead/Prospect Subtype)
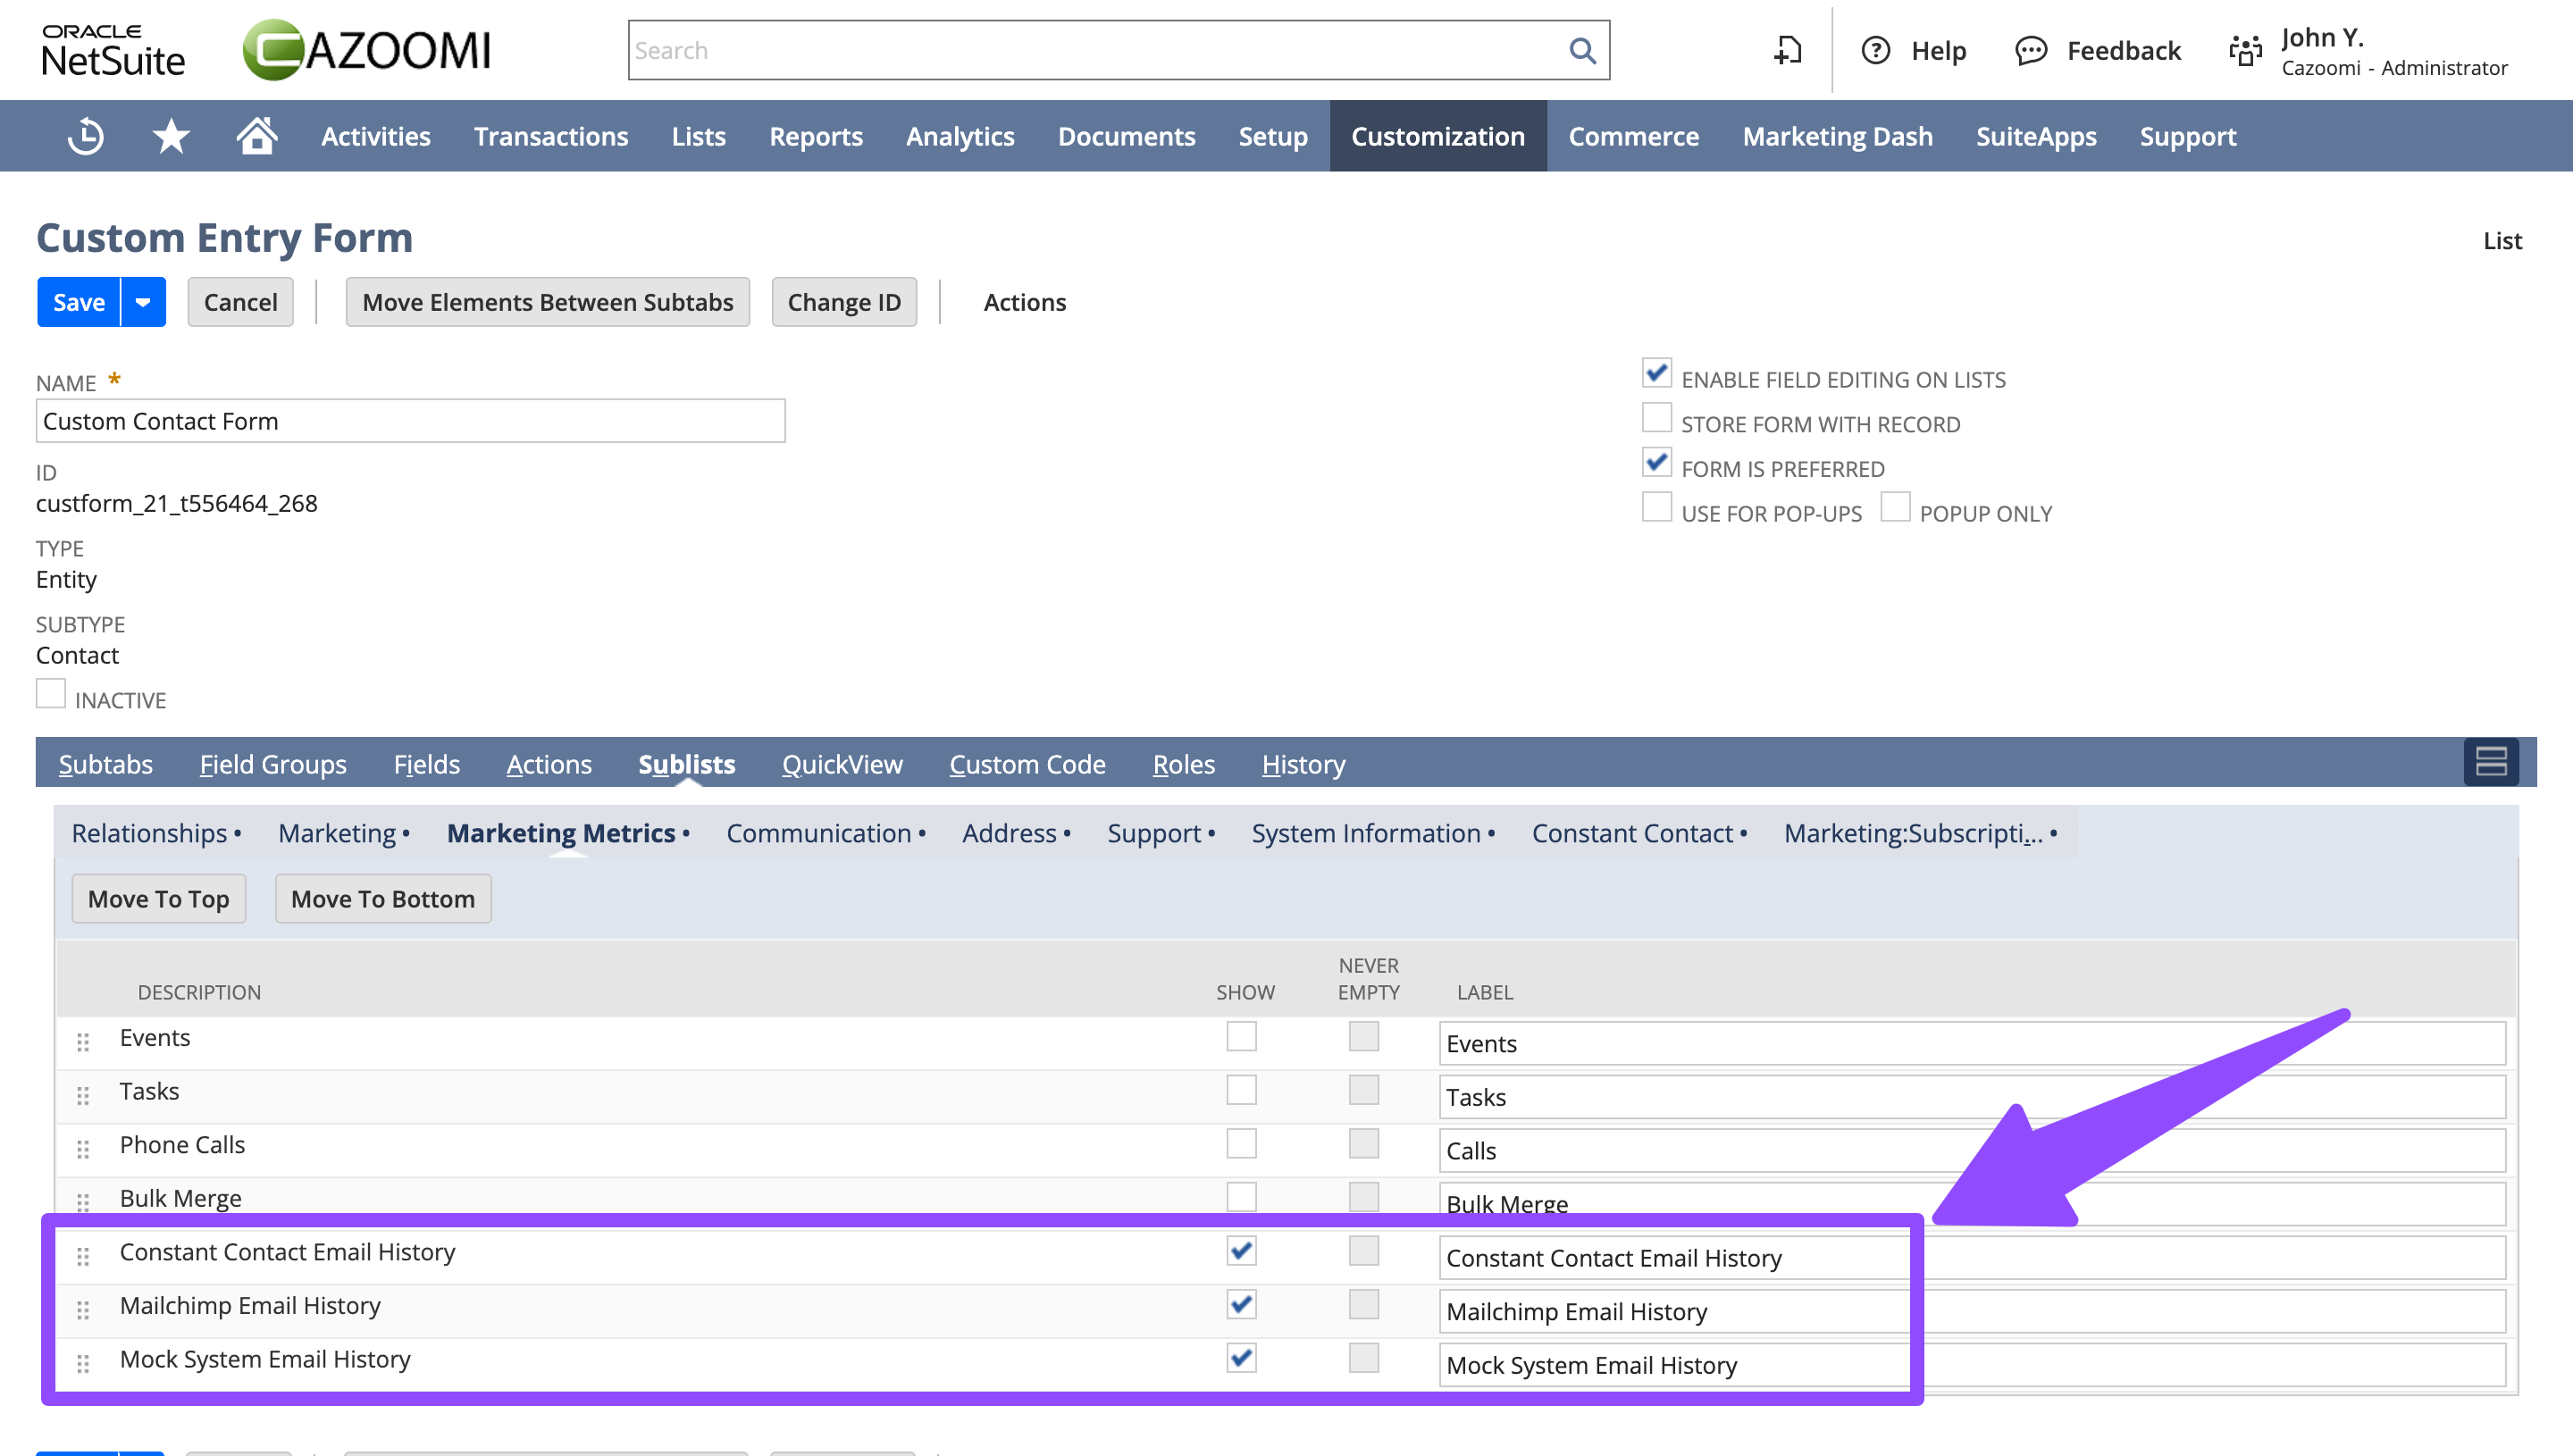
SyncApps has a feature that creates a "Custom" subtab for each individual Contact or Customer. This Subtab displays the email history of the selected Marketing Automation Software, along with the associated Campaigns and Metrics.
By selecting "All Contacts" in the "Records to Sync" field, Email Marketing Data will be automatically synced to the Custom Subtab of any NetSuite Contact or Customer Record.
If this "Sync Email Marketing Data" option is checked in Step 1, Email Marketing data (Opens, Clicks, and URLs Clicked) will be synced to a custom record in NetSuite.
The URLs Clicked should be visible in the Email Events field as shown below on the Contact Custom Subtab:
SyncApps will automatically create the Custom Record and capture data starting with the creation date and on a rolling 30-day basis after a Campaign is initiated.
Email Marketing Campaign Metrics land on the Custom Subtab on the NetSuite Customer/Contact record.
You can change the NetSuite Custom Subtab name to meet your needs in NetSuite.
If you need Campaign Metrics flowing back into NetSuite on a longer rolling basis, contact our 24/7 Support so we can enable it.
Troubleshooting:
If SyncApps logs display Campaigns are synced, but no email history records are created in NetSuite, follow the steps below:
- Open menu Setup > Integration > Web Service Process Status
- Download recent requests and response files.
- Please send the request and response files (the latest one) to our 24/7 support team along with your Set Up ID or URL. We're always here to help you make the most of our solution!
Need some help?
Check out the options below for contacting our Support Team and finding the answers you need to help you with your SyncApps integrations.
Help Center & Email is 24/7 to [email protected] | Live Chat & Phone is scheduled.
FAQs
Check out these Help Desk articles for answers to frequently asked questions.
Situation: The marketing team needs to ensure that when Sales makes changes to a record in the CRM, those records are automatically removed from marketing activities.
This covers scenarios like removing the record's Tag, taking it out of a Saved Search, Marketing List, List View, or Campaign, so it is removed from the corresponding Marketing List, Audience, Group, or Tag.
USE CASES:
Making sure your targeting is on point. For instance, when a lead becomes an active customer, you need to change the tag across platforms.
NetSuite Saved Search members fall out and you need this record to be removed from a Constant Contact List or ActiveCampaign Tag.
Your team changes a CRM record's status or a dropdown selection, and you need this action to then remove or add a Group/Tag in Mailchimp.
Salesforce member statuses change and you want this to be reflected in Mailchimp.
The list of use cases are numerous yet the one thing that remains the same is removal from your marketing automation flows so you are always marketing to the right people, at the right time.
Enter the Full Sync
This feature allows you to easily automate your workflow around cleaning up your Marketing Automation Lists/Groups. You can scale your growth and spend less time on repetitive tasks using it.
Full sync depends on list/segmentation functionality, so it will be processed for these scenarios:
- CRM or eCommerce Segmentation in Step 1 of your integration.
- SyncApps Segmentation: Filtering + Segmentation feature of your integration.
For Salesforce integrations, Full Sync is applicable under the following conditions:
- Will work with Campaign or List View enabled to remove records from each correspoding List, Groups or Tag.
- It will work if no Campaign or List View is enabled in Step 1, but Segmentation is enabled in Step 5.
- Will work with Checkbox Field Segmentation to remove records from each correspoding List, Groups or Tag.
To automatically remove records from your Marketing Automation solution when they are no longer a part of any synced CRM Marketing List, subscribing to our Full Sync is a great solution as it is the only way to automatically remove a CRM member from a synced external Constant Contact List, Mailchimp Group, Mailchimp Tag.
Using Filtering and Segmentation with Full Sync?
Mailchimp Notes:
The Full Sync will not remove a record from a Mailchimp Group or Tag if it does not match the filter in Steps unless using a segmentation method in Step 1 or the "Enable Segmentation" feature of your integration in Step 4 or 5.
Example Segmentation Method in Step 1 and Step 2:
Sync Salesforce Campaign/List Members and select Mailchimp Group or Tag as the Segmentation Method
Example Segmentation Method in Steps:
If you want to sync all Contacts in Step 1 and filter against your entire contacts yet, still remove records from a Mailchimp Group or Tag, be sure to enable the segmentation feature on filtering. Each "Segment Name" will be synced to a Mailchimp Group or Tag, depending on your choice in Step 2.
Important: The Full Sync is needed to remove a record from a Mailchimp Group or Tag if it does not match the Filter & Segmentation criteria set up in your Set Up.
If you would like to remove a record from a Mailchimp Audience each time the Full Sync runs, please enable this feature in Step 2 of your integration.
If you enable segmentation on filtering, use Full Sync, and if the contact or lead is no longer part of a segment, SyncApps will remove the contact from the Mailchimp Group or Tag.
Full Sync for NetSuite to Act-On or our other Marketing Automation integrations?
Need to test our Full Sync for NetSuite to Act-On?
See our use case below to help you get an idea of how to do it:
1. Create a NetSuite Saved Search named "Customization Test," and let’s say it was initially five entries. Create an Act-On Marketing List named "Customization_Test" and set the NetSuite Saved Search to sync with that Act-On List. After this, press Sync, and all five expected entries will be synced in the Act-On list.
2. Remove one entry in the NetSuite Saved Search, and then next, trial the Full Sync in the steps.
Once Full Sync is enabled, the Full Sync option will appear in Step 3.
3. Press the Reset Sync Process button from the dashboard and rerun the Sync. The result will show that the customization really works as the Act-On List now has only four entries, a complete replica of the NetSuite Saved Search.
Need some help?
Check out the options below on contacting our Support team and finding the answers you need to help you with your SyncApps integrations.
Help Center & Email is 24/7 to [email protected] | Live Chat & Phone is scheduled
FAQs
Check out these Help Desk articles for answers to frequently asked questions.